

Installation Step by Step | How Arthur Acoustics Installs BASWA Acoustic Plaster
Arthur Acoustics delivers a structured, precision-managed installation process for every BASWA seamless acoustic plaster project across the UK. Achieving a completely flat, monolithic ceiling or wall with Class A sound absorption requires disciplined substrate preparation, exact panel alignment, and master hand-trowelled marble-sand finishing. Below is our step-by-step installation workflow from pre-start site inspection through to final handover.
Step 1: Pre-Start Site Survey & Substrate Verification
Before any acoustic materials arrive on site, our technical managers carry out a thorough pre-start inspection to ensure the building environment is ready:
-
Structural & Deflection Checks. Solid concrete soffits or suspended plasterboard substrates are checked for flatness, structural stability, and compliance with deflection tolerances (typically L/500).
-
Airtightness & Moisture Testing. Substrates must be completely dry, clean, and sealed against rear air movement so pressure differentials cannot draw dust through the microporous finish over time.
-
Service & Perimeter Coordination. All first-fix MEP cut-outs—including lighting housings, HVAC plenums, sprinklers, access hatches, and invisible speakers—are verified against the reflected ceiling plan.
Step 2: Perimeter Profiles & Edge Trims
Clean architectural junctions begin at the room boundaries. Our craftsmen install dedicated BASWA aluminium edge profiles and shadow-gap trims around all wall perimeters, structural glazing lines, bulkheads, and service penetrations to establish crisp, laser-level datum lines.
Step 3: Acoustic Panel Bonding & Mechanical Fixing
Next, high-density, pre-coated BASWA acoustic panels (available in 30 mm, 40 mm, 50 mm, or 70 mm profiles) are installed across the ceiling or wall plane:
-
Direct Adhesive Bonding. For solid concrete and boarded ceilings, panels are bonded using BASWA mineral adhesive applied with a notched trowel in staggered brick-bond courses.
-
Direct-to-Grid Mounting (BASWA DTG). Where BASWA DTG is specified, foil-backed panels are mechanically fixed directly onto suspended metal furring (MF) framing using specialist screws and stainless-steel discs—eliminating plasterboard entirely.
-
Curved & Vaulted Shaping. For domes, barrel vaults, and sweeping geometries, factory-slotted flexible panels are contoured smoothly to follow the architectural curve.
Step 4: Joint Grouting & Precision Flat-Sanding
Once the acoustic panels are securely set, our installation team fills every panel joint, screw recess, and perimeter junction with BASWA Fill compound. After curing, the entire ceiling surface is machine-sanded with dust-extracted rotary sanders to create a uniform, razor-flat plane with zero panel telegraphing.
Step 5: Hand-Trowelled Base & Finishing Coats
With the substrate perfected, our certified BASWA artisans apply the microporous marble-sand plaster layers:
-
Single-Coat or Two-Coat Build-Up. Depending on your specification, either a single precision coat (BASWA Phon Base, Fine, Basic, or One) or a two-coat build-up (BASWA Phon Classic Base, Classic Fine, or Classic Top) is hand-trowelled across the ceiling.
-
Controlled Drying Between Coats. Each plaster layer is allowed to cure naturally under stable room temperatures and humidity before the next stage proceeds.
-
Bespoke Colours & Finishes. Finishes are applied in crisp architectural white (~NCS S 0500-N), custom-tinted BASWA Colours, BASWA Shine metallic blends, or sculptural BASWA Textures.
Step 6: Second-Fix Trim Integration & Final Quality Handover
Once the finishing coat has fully cured, second-fix lighting bezels, linear LED diffusers, sprinklers, and concealed access hatches are fitted cleanly into their pre-formed housings. Our site manager completes a grazing-light quality inspection across every square metre before handing over your finished ceiling alongside care instructions and maintenance guidance.
Typical Project Programme & Site Conditions
To protect the integrity of your BASWA installation, site conditions must remain weather-tight with glazed windows installed, ambient temperatures maintained between 10°C and 25°C, and wet trades completed prior to plastering. Depending on area size and whether a single-coat or two-coat system is specified, typical installations take between 3 and 10 working days—or as little as one day for compact BASWA One projects.
Nationwide Installation by Certified BASWA Craftsmen
Operating from our Henlow Specification Centre on the Bedfordshire and Hertfordshire border and our St Albans office, Arthur Acoustics delivers turnkey BASWA acoustic plaster installations across London, Cambridge, Oxford, Manchester, and throughout the United Kingdom.
Discuss Your Construction Programme or Book a Showroom Visit
Planning an upcoming fit-out or new build? Speak with our contracts team for lead times, programme advice, and substrate guidance, or arrange a visit to our Henlow showroom.
Call us on 01462 534610 or email baswa@arthuracoustics.co.uk to speak with a specialist.
Our Guide to Installing Acoustic Plaster System
Cutting Acoustic Panel
To install a Baswa acoustic panel on the ceiling, start by measuring the area where the panel will be placed to ensure a proper fit. Carefully the dimensions on the panel and use a suitable cutting tool, such a utility knife or saw, to cut the panel to size. Once cut, prepare the ceiling surface by cleaning it and applying the recommended adhesive for optimal adhesion. Finally, press the panel firmly into place, ensuring it aligns correctly with the surrounding panels for a seamless finish.

Gluing Acoustic Panel to ceiling
To glue the acoustic Baswa panel to the ceiling, start by preparing the surface to ensure it clean and dry. Apply a suitable adhesive evenly on the back of the panel, following the manufacturer's instructions for optimal results. Carefully position the panel against the ceiling, ensuring it is aligned correctly before pressing it firmly into place. Allow adhesive to cure as recommended, ensuring a secure and effective installation that sound absorption in your space.

Filling Acoustic Panel Joints
To fill the joints between the Baswa acoustic panel joints prior to plastering, start by mixing the filler with water according to the manufacturer's instructions. Once the mixture reaches a smooth, workable consistency, apply it carefully into the gaps between the panels. Use a trowel to ensure the filler is evenly distributed, creating a finish that integrates well with the surrounding surfaces. Allow the filler to dry completely (around 36 hours) before proceeding with the sanding process for optimal results.

Sanding the Acoustic Panel
Arthur Acoustics use air-assisted masks during the sanding of BASWA panels to ensure a flat surface is achieved, ready for plastering. This innovative approach not only enhances the efficiency of the sanding process but also protects our team from dust and particles, a safer work environment. By utilising air-assisted technology, we can maintain high standards of quality while minimising airborne contaminants, resulting in a smoother finish
Applying the Acoustic Plaster
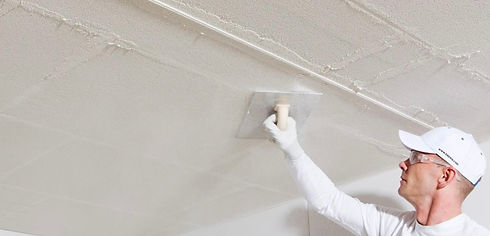
Arthur Acoustics expertly applies Baswa acoustic plaster using either a 3mm trowel or a Baswa jet spray machine. The process begins with gauging the plaster using the notched trowel, ensuring an eveness across the surface. While the plaster is still wet, it is carefully smoothed off to create a seamless finish, enhancing both the aesthetic and acoustic properties of the space. This meticulous application technique contributes to a serene, reducing noise levels for a more comfortable atmosphere.

Acoustic Plaster Smoothing
Quiet spaces are achieved through the meticulous work of dedicated craftsmen who expertly trowel smooth acoustic plaster for an impeccable finish. Utilising flexible type trowels, these skilled artisans ensure that every ceiling is refined to perfection, enhancing both the aesthetic appeal and acoustic performance of the space. Their attention to detail and commitment to quality craftsmanship result in environments that not only look stunning but also provide the tranquility needed in any setting. The combination of their expertise and the right tools creates an ultimate finish that elevates the overall ambiance
